90 Days to CCIE SEC v6.1 Lab
Cisco Flex VPN – Active/Active and Active/Standby
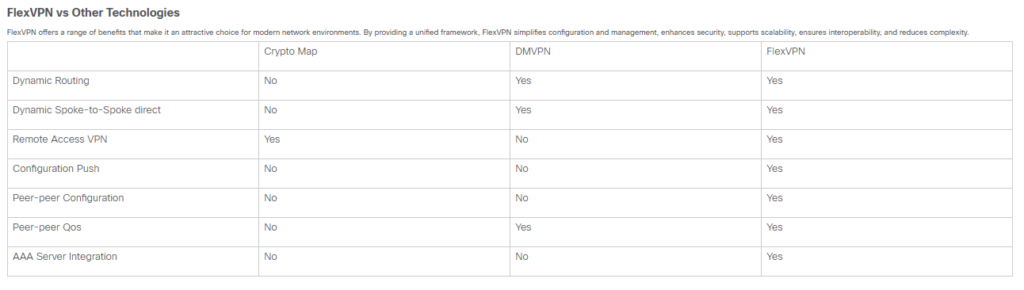
FlexVPN is Cisco’s unified framework for deploying IKEv2-based IPsec VPNs. It replaces legacy technologies like DMVPN and EasyVPN by providing a single, modular CLI that scales from simple site-to-site tunnels to complex hub-and-spoke and full-mesh topologies.
Key Features
- Dynamic Configuration and On-Demand Tunnels:
- FlexVPN connection is initiated, the system generates a virtual access interface based on a pre-configured template. This interface acts as the tunnel endpoint for the duration of the connection. Once the tunnel is no longer needed, the virtual access interface is torn down, freeing up system resources.
- Flexibility in Deployment:
- Hub-and-Spoke Model: A central hub connects to multiple branch offices. FlexVPN simplifies setting up these connections with a single framework, making it ideal for large networks.
- Full Mesh and Partial Mesh Topologies: All sites can communicate directly without going through a central hub, reducing delay and improving performance.
- High Availability and Redundancy:
- Redundant Hubs: Supports multiple hubs for backup. If one hub fails, branches can connect to another hub, ensuring continuous connectivity.
- Load Balancing: This distributes VPN connections across multiple devices to avoid any single device becoming overloaded, which is crucial for maintaining performance in large deployments.
IKEv2 vs IKEv1
FlexVPN leverages IKEv2, which supports modern cryptographic algorithms such as AES (Advanced Encryption Standard) and SHA-256 (Secure Hash Algorithm). These algorithms provide strong encryption and data integrity, protecting the data transmitted over the VPN from being intercepted or tampered with.
IKEv2 offers more authentication methods compared to IKEv1. Besides Pre-Shared Key (PSK) and certificate-based and hybrid authentication types, IKEv2 allows the responder to utilize the Extensible Authentication Protocol (EAP) for client authentication.
In FlexVPN, EAP is used for client authentication, the router acts as a relay, passing EAP messages between the client and the backend EAP server, typically a RADIUS server. FlexVPN supports various EAP methods, including EAP-TLS, EAP-PEAP, EAP-PSK, and others, for securing the authentication process.
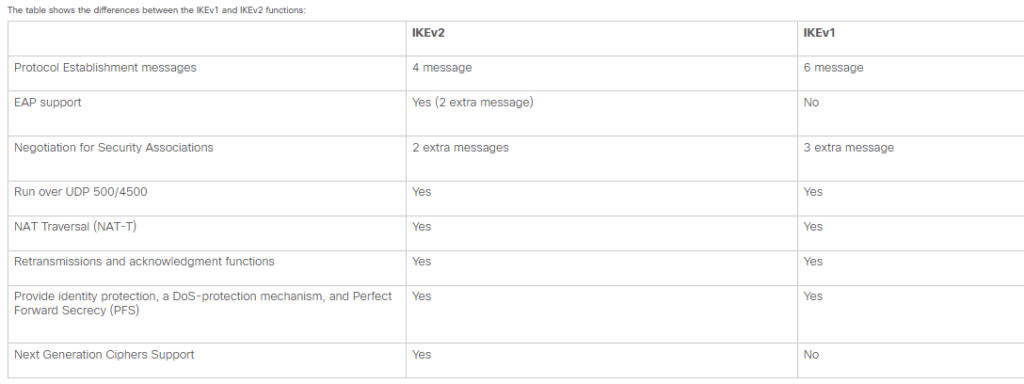
The table shows the differences between the IKEv1 and IKEv2 functions:
The FlexVPN Concept
At its core, FlexVPN is built on Internet Key Exchange version 2 (IKEv2). Unlike older IKEv1-based solutions, it uses a simplified exchange process (4 messages instead of 6) and natively supports advanced features like Next-Generation Encryption (NGE).
- Virtual Access Interfaces: Instead of static crypto maps, FlexVPN dynamically clones “Virtual Access” interfaces from a Virtual Template. This allows a single Hub configuration to support thousands of spokes without unique tunnel interfaces for each.
- Modular Architecture: Components (IKEv2 Proposal, Policy, Profile, and IPsec Profile) are configured independently and then linked together. This modularity allows for asymmetric authentication, where the Hub and Spoke can use different keys or methods (e.g., PSK vs. Certificates).
- Smart Defaults: Cisco includes “smart defaults” for many crypto parameters to reduce configuration complexity, though these can be disabled for custom high-security requirements.
Step-by-Step Configuration (Hub-and-Spoke)
Below is the standard workflow to establish a FlexVPN tunnel between two routers:
- Define IKEv2 Proposal & Policy: Specify encryption (e.g., AES-256), integrity (SHA-256), and Diffie-Hellman group (Group 14+).
- Configure a Keyring: Define the Pre-Shared Keys (PSKs) for peer authentication.
- Create an IKEv2 Profile: This acts as the “glue” that matches peer identities (like IP address or FQDN), links the keyring, and specifies the authentication method.
- Define IPsec Parameters: Create an IPsec transform set (for data protection) and wrap it in an IPsec Profile that references your IKEv2 profile.
- Provision the Tunnel Interface:
- On the Hub: Create a
virtual-templateinterface and applytunnel protection ipsec profile. - On the Spoke: Create a standard
interface Tunnel, pointing to the Hub’s public IP.
- On the Hub: Create a
- Enable Routing: Use protocols like EIGRP or BGP over the tunnel to exchange internal network prefixes.
Verification & Troubleshooting
Use these commands on the Cisco CLI to confirm operation and resolve issues:
show crypto ikev2 sa: Verifies that the Phase 1 control tunnel is established.show crypto ipsec sa: Confirms Phase 2 (data) SAs are up and shows packet counters for encryption/decryption.show crypto ikev2 profile: Checks if the peer is matching the correct profile.debug crypto ikev2 [error|packet]: Essential for identifying mismatched keys, unsupported encryption algorithms, or identity mismatches.show ip route: Verifies that routes are being learned across the tunnel.
FlexVPN deployment, you need to handle multiple ISP connections. FlexVPN’s modularity makes it significantly easier to manage Dual WAN compared to legacy DMVPN.
- Dual WAN Technical Logic
In a Dual WAN setup, the Spoke router maintains two physical paths to the Hub. FlexVPN treats these as separate IKEv2 sessions.
- Active/Active: Both tunnels are up simultaneously. Traffic is balanced using Equal-Cost Multi-Path (ECMP) routing or Performance Routing (PfR).
- Active/Standby: Both tunnels may be up, but routing metrics (like Administrative Distance or Interface Priority) ensure only one path is used unless the primary fails.
2. Configuration Workflow
A. The Hub Side (Agostic to Spoke WAN)
The Hub typically doesn’t care how many WANs the spoke has. It simply needs a Virtual Template ready to clone an interface for every incoming request.
- Ensure the Hub has a static public IP for each ISP or a DNS name mapped to both for Redundancy.
B. The Spoke Side (The Intelligence)
On the Spoke, you define two separate Tunnel interfaces, each tied to a specific physical WAN interface using the tunnel source command.
- Define Two Tunnels:
interface Tunnel1->tunnel source GigabitEthernet1(ISP-A)interface Tunnel2->tunnel source GigabitEthernet2(ISP-B)
- Apply Security: Both tunnels can share the same IKEv2 Profile and IPsec Profile, keeping the config clean.
- Routing Strategy:
- For Active/Active: Use a routing protocol (like BGP or EIGRP) and ensure the metrics for both tunnel paths are identical. Check the Cisco BGP Multipath guide for load-balancing steps.
- For Active/Standby: Apply a higher
delay(EIGRP) or highercost(OSPF) to the backup tunnel. Alternatively, use Floating Static Routes with different Administrative Distances.
3. Verification & Troubleshooting
show crypto session: In a Dual WAN setup, you should see two sessions for the same Hub destination but via different local interfaces.show ip route [destination]: Verify if the routing table shows one path (Standby) or two paths (Active/Active).show monitor event-trace vpn: Useful for seeing how FlexVPN reacts when one WAN link flapps.
Use IP SLA (Service Level Agreements) to monitor the health of the primary ISP. If latency spikes or packets drop, the Spoke can automatically pull the primary route, forcing traffic to the Standby tunnel.
Cisco Reference Guide as PDF.
Happy Labingggggggggggggggg!