Building a Local AI using AMD Radeon Pro WX7100 (Ubuntu 26.04) – Network and Security Engineer Automation.
Introduction
This project documents the process of building a completely local AI platform for Network Operations (AI NetOps) using an AMD Radeon Pro WX7100 GPU and open-source software.
The goal is to build an AI assistant capable of:
- Understanding Cisco technologies
- Performing Retrieval-Augmented Generation (RAG) using networking documentation
- Integrating with automation tools such as Netmiko and pyATS
- Running entirely on local infrastructure without requiring cloud-based LLM services
This blog covers the work completed so far and outlines the planned roadmap.
Project Objectives
The long-term objective is to build an AI platform that can:
- Answer networking questions
- Analyze Cisco configurations
- Interpret “show” command outputs
- Troubleshoot network issues
- Retrieve information from Cisco documentation
- Execute approved automation tasks
- Operate entirely on local hardware
Hardware Platform
Server
- Ubuntu 26.04
- GCC 15.x
- Docker
- Python 3
GPU
AMD Radeon Pro WX7100
Specifications:
- Polaris10 GPU
- 8 GB GDDR5 VRAM
- Vulkan support
- Mesa RADV driver
Phase 1 – GPU Validation
The first task was verifying that Ubuntu correctly detected the GPU.
Verified using:
lspci
vulkaninfo –summary
Result:
- AMDGPU driver loaded successfully
- Vulkan detected
- RADV driver active
- GPU available to compute applications
Phase 2 – Building llama.cpp
Initially, several compilation problems were encountered.
Examples included:
- Vulkan API compatibility errors
- Missing GLSL compiler
- Missing SPIRV-Headers
- CMake configuration issues
- Compiler compatibility with GCC 15
- Build failures in older llama.cpp releases
After evaluating multiple commits, the latest upstream release successfully compiled with Vulkan support.
Successful build options:
cmake -B build \
-G Ninja \
-DGGML_VULKAN=ON \
-DCMAKE_BUILD_TYPE=Release
ninja -C build
Phase 3 – Verifying GPU Support
Verification command:
./build/bin/llama-cli –list-devices
Result:
Vulkan0:
AMD Radeon Pro WX7100
This confirmed Vulkan acceleration was functioning correctly.
Phase 4 – Installing Qwen3
The selected model was:
Qwen3-8B-Q4_K_M.gguf
The model was downloaded again from Hugging Face and verified successfully.
Phase 5 – Running llama-server
The server was launched with:
./build/bin/llama-server \
-m ~/models/Qwen3-8B-Q4_K_M.gguf \
-ngl 99 \
-c 8192 \
-t $(nproc) \
–host 0.0.0.0 \
–port 8080
Successful startup confirmed:
- Model loaded
- Vulkan backend initialized
- OpenAI-compatible API available on port 8080
Phase 6 – Performance Testing
Multiple GPU layer configurations were evaluated.
Test 1
GPU Layers:
40
Performance:
- Prompt: 144 tokens/sec
- Generation: 16.3 tokens/sec
Test 2
GPU Layers:
99
Performance:
- Prompt: 55.9 tokens/sec
- Generation: 20.4 tokens/sec
This configuration provided the best generation speed.
Long-running generation tests produced stable performance around:
- Prompt evaluation: ~75 tokens/sec
- Generation: 15–17 tokens/sec
The system remained stable throughout extended inference sessions.
Test 3
./build/bin/llama-server \
-m ~/models/Qwen3.5-2b-Kimi-and-Opus-Distillation.Q8_0.gguf \
-c 16384 \
-ngl 80 \
–parallel 1 \
-t 16 \
-tb 32 \
-b 2048 \
-ub 1024 \
–flash-attn auto \
–cache-type-k q4_0 \
–cache-type-v q4_0 \
–no-mmap \
–host 0.0.0.0 \
–port 8080 \
–log-file /var/log/llama_server.log \
–log-colors on \
–metrics \
–mlock \
–context-shift \
–fit on \
–fit-ctx 16384 \
–keep 1 \
-n -1
GPU Layers:
80
Performance:
40Tokens /Second
This configuration provided the best generation speed.
Current Architecture
AMD WX7100
│
Vulkan Backend
│
llama.cpp
│
llama-server
│
Qwen3-8B
│
OpenAI-Compatible API
Lessons Learned
Several valuable lessons emerged:
- Always verify downloaded GGUF files before testing.
- Use current upstream llama.cpp releases for newer compilers.
- Install Vulkan development dependencies before compiling.
- Build with Ninja for faster incremental compilation.
- Test GPU detection before attempting model inference.
- Benchmark multiple GPU layer settings instead of assuming higher values are always faster.
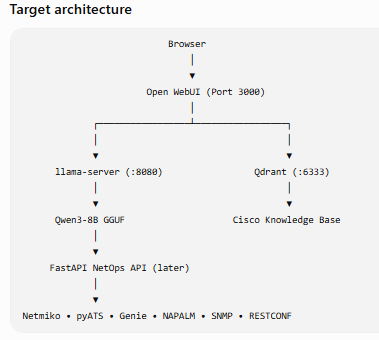
Next Phase – User Interface
The next milestone is integrating Open WebUI.
Planned architecture:
Open WebUI
│
▼
llama-server
│
▼
Qwen3
Objectives:
- Browser-based chat interface
- OpenAI-compatible connection
- Multiple chat sessions
- Conversation history
- User management
Next Phase – Retrieval-Augmented Generation (RAG)
A Qdrant vector database will be introduced.
Knowledge sources will include:
- Cisco documentation
- RFCs
- Internal runbooks
- pyATS reports
- Device configurations
- Troubleshooting guides
Expected architecture:
Qdrant
│
Cisco Documents
│
Retriever
│
Qwen3
Next Phase – AI Network Operations
The project will then integrate automation tools.
Components include:
- FastAPI
- Netmiko
- pyATS
- Genie
- PostgreSQL
- SNMP
- RESTCONF
- NETCONF
This enables the assistant to reason over documentation while also interacting with live network devices.
Planned Testing Roadmap
The following tests are planned as development progresses.
Performance
- GPU layer benchmarking
- Context window scaling (8K, 16K, 32K)
- Concurrent user testing
- Long-duration inference stability
- Memory and VRAM utilization
RAG
- Retrieval accuracy
- Chunk size optimisation
- Embedding model comparison
- Citation quality
- Response latency
Networking
- Cisco configuration explanation
- Routing protocol analysis
- VXLAN EVPN troubleshooting
- BGP policy validation
- OSPF analysis
- Wireless controller diagnostics
- SD-WAN troubleshooting
Automation
- Netmiko command execution
- pyATS parsing
- Genie structured output
- Approval workflows
- Error handling and recovery
Security
- API authentication
- Role-based access control
- Audit logging
- Secure secret management
Future Vision
The final platform will combine local LLM inference, RAG, automation, and operational data into a single AI NetOps assistant capable of assisting with day-to-day network engineering tasks while keeping sensitive information on local infrastructure.
I have also found an old NVIDIA Quadro K2200 with 4GB of RAM; let me try that in the Home Lab and post the next blog test results and interactions with My Lab (like Cisco Routers/Switches/WLCs/ firewalls).
Conclusion
This project has progressed from validating GPU support and overcoming build challenges to successfully running a Vulkan-accelerated local LLM on AMD hardware.
The foundation is now in place for the next stages: integrating Open WebUI, building a Cisco-focused knowledge base with Qdrant, and adding network automation through FastAPI, Netmiko, and pyATS.
Future updates will document the continued evolution of this local AI Network Operations platform.
Happy Labbinggggggggggggg!