Cisco Prime Infrastruture – Upgrade from 3.4 to 3.9 /3.10
I follow below steps for good upgrade without any loss of data, Different Engineer follow different appoaches, but i did best way to be safe and data retention as expected.
Give enough time for upgrade, since Prime Infra is a Manamgent tool which not effect you Live environment so you can do offline.
But make sure you be Patient – restore and backup Long Long Hours.
3.4 to 3.9 – This will take 3-4 days task. ( be patient)
When you move your data to Prime Infrastructure 3.4, the following Assurance data is not migrated:
- Raw NetFlow information
- Custom NetFlow reports
- Packet capture files
- Processed non-aggregated data, such as PFR data and URLs
Additional Steps:
- Data backup required every upgrade, it will be time consumption process.
- Resynchronize WLC Configurations after Migration (of every version).
- Renew AAA Settings After Installing a New Prime Infrastructure Version
Backup are 2 Types Application and Appliance, you need to take application backup
Application Backups
Use this procedure to trigger an immediate Application backup using the CLI.
| Step 1 | Log into the server as a Prime Infrastructure CLI admin user (see Establish an SSH Session With the Prime Infrastructure Server). |
| Step 2 | Display the list of backups, where repositoryName is the backup repository: show repository repositoryName |
| Step 3 | Start the remote backup. backup filename repository repositoryName application NCS You will be prompted to enter the password. Enter the password if you want to secure the backup with password, else press Enter. You have to remember the password to restore the backup. where filename is the name that you want to give the appliance backup file (for example, myBackup).The character length of the file name is 26. Other information is appended to the filename automatically, as explained in Backup Filenames |
Appliance Backups
Use this procedure to perform an Appliance backup using the CLI.
| Step 1 | Make sure the remote host is available. |
| Step 2 | Log into the Prime Infrastructure server as admin (see Establish an SSH Session With the Prime Infrastructure Server). |
| Step 3 | Start the remote backup: (admin)# backup filename repository repositoryName |
| Step 4 | To verify that the backup transfer is complete, view the md5CheckSum and file size. |
Upgrade steps from 3.3 to 3.4 (before we upgrade to Final Version)
| Step 1 | Set up a remote backup repository for the Prime Infrastructure version you are currently running. |
| Step 2 | Take an application backup of the Prime Infrastructure version you are currently running, and store the backup in the remote repository. |
| Step 3 | Verify the integrity of the backup |
| Step 4 | Remove any existing High Availability configuration from your primary Prime Infrastructure server. You can do this using either of the following options: Launch Prime Infrastructure, choose Administration > Settings > High Availability > HA Configuration, and click Remove. Ensure the configuration mode changes to “HA Not Configured.” Ensure the primary server is the active Prime Infrastructure server, go to the admin console on the primary server and run the ncs ha remove command. |
| Step 5 | Move backup files (all files with the tar.gz extension) from the /localdisk directory to another server and ensure that /localdisk has 80% free space. |
| Step 6 | Download the upgrade bundle PI_BUNDLE-3.4.0.0.348-Upgrade.tar.gz from Cisco.com and verify the integrity using its checksum listed on Cisco.com. |
| Step 7 | Copy the verified upgrade file to the default repository: Example: admin# copy source disk :/defaultRepo Where: source is the upgrade file’s URL, path and filename (for example: FTP://<YourFTPServer>/(PI_BUNDLE-3.4.0.0.348-Upgrade.tar.gz). disk is the disk and path to the local defaultRepo. |
| Step 8 | Ensure the current version of Prime Infrastructure is 3.1.x or 3.2.x or 3.3.x. |
| Step 9 | Ensure the local repository (defaultRepo) contains no backup files. |
| Step 10 | Stop the Prime Infrastructure server by entering the command ncs stop. |
| Step 11 | It is recommended to run the application upgrade from the console. For a virtual appliance, you can run the application upgrade from the VM console. For a physical appliance, you can run the application upgrade from the KVM, VGA, or serial console. (If you are using the serial console, make sure baud rate is configured to 9600. Example: admin# application upgrade PI_BUNDLE-3.4.0.0.348-Upgrade.tar.gz defaultRepo (For upgrading from 3.1.x/3.2.x/3.3.x to 3.4) This step can take several hours to complete, depending on the size of the application database. |
| Step 12 | When the upgrade is complete: Verify that the application is running by entering the ncs status command in the admin console. Instruct users to clear the browser cache on all client machines that accessed an older version of Prime Infrastructure before they try to connect to the upgraded Prime Infrastructure server. Once Upgrade to 3.4 – Take an Application & Appliance backup. |
| Upgrade from Prime Infra 3.4 to 3.7 | |
| Step 1 | Set up a remote backup repository for the Prime Infrastructure version you are currently running. |
| Step 2 | Take an application backup of the Prime Infrastructure version you are currently running, and store the backup in the remote repository. |
| Step 3 | Verify the integrity of the backup |
| Step 4 | Remove any existing High Availability configuration from your primary Prime Infrastructure server. You can do this using either of the following options: Launch Prime Infrastructure, choose Administration > Settings > High Availability > HA Configuration, and click Remove. Ensure the configuration mode changes to “HA Not Configured.” Ensure the primary server is the active Prime Infrastructure server, go to the admin console on the primary server and run the ncs ha remove command. |
| Step 5 | Move backup files (all files with the tar.gz extension) from the /localdisk directory to another server and ensure that /localdisk has 80% free space. |
| Step 6 | Download the upgrade bundle Login and Service Contract Required PI-Upgrade-31x_32x_33x_34x_to_3.7.0.0.159.tar.gz from Cisco.com and verify the integrity using its checksum listed on Cisco.com. |
| Step 7 | Copy the verified upgrade file to the default repository: Example: admin# copy source disk :/defaultRepo Where: source is the upgrade file’s URL, path and filename (for example: FTP://<YourFTPServer>/(Login and Service Contract Required PI-Upgrade-31x_32x_33x_34x_to_3.7.0.0.159.tar.gz). disk is the disk and path to the local defaultRepo. |
| Step 8 | Ensure the current version of Prime Infrastructure is 3.4. |
| Step 9 | Ensure the local repository (defaultRepo) contains no backup files. |
| Step 10 | Stop the Prime Infrastructure server by entering the command ncs stop. |
| Step 11 | It is recommended to run the application upgrade from the console. For a virtual appliance, you can run the application upgrade from the VM console. For a physical appliance, you can run the application upgrade from the KVM, VGA, or serial console. (If you are using the serial console, make sure baud rate is configured to 9600. Example: admin# application upgrade Login and Service Contract Required PI-Upgrade-31x_32x_33x_34x_to_3.7.0.0.159.tar.gz defaultRepo (For upgrading from 3.4 to 3.7) This step can take several hours to complete( for me it took 14 hours), depending on the size of the application database. |
| Step 12 | When the upgrade is complete: Verify that the application is running by entering the ncs status command in the admin console. Instruct users to clear the browser cache on all client machines that accessed an older version of Prime Infrastructure before they try to connect to the upgraded Prime Infrastructure server. |
Upgrade from Prime Infra 3.4 to 3.7
| Step 1 | Set up a remote backup repository for the Prime Infrastructure version you are currently running. |
| Step 2 | Take an application backup of the Prime Infrastructure version you are currently running, and store the backup in the remote repository. |
| Step 3 | Verify the integrity of the backup |
| Step 4 | Remove any existing High Availability configuration from your primary Prime Infrastructure server. You can do this using either of the following options: Launch Prime Infrastructure, choose Administration > Settings > High Availability > HA Configuration, and click Remove. Ensure the configuration mode changes to “HA Not Configured.” Ensure the primary server is the active Prime Infrastructure server, go to the admin console on the primary server and run the ncs ha remove command. |
| Step 5 | Move backup files (all files with the tar.gz extension) from the /localdisk directory to another server and ensure that /localdisk has 80% free space. |
| Step 6 | Download the upgrade bundle Login and Service Contract Required PI-Upgrade-31x_32x_33x_34x_to_3.7.0.0.159.tar.gz from Cisco.com and verify the integrity using its checksum listed on Cisco.com. |
| Step 7 | Copy the verified upgrade file to the default repository: Example: admin# copy source disk :/defaultRepo Where: source is the upgrade file’s URL, path and filename (for example: FTP://<YourFTPServer>/(Login and Service Contract Required PI-Upgrade-31x_32x_33x_34x_to_3.7.0.0.159.tar.gz). disk is the disk and path to the local defaultRepo. |
| Step 8 | Ensure the current version of Prime Infrastructure is 3.4. |
| Step 9 | Ensure the local repository (defaultRepo) contains no backup files. |
| Step 10 | Stop the Prime Infrastructure server by entering the command ncs stop. |
| Step 11 | It is recommended to run the application upgrade from the console. For a virtual appliance, you can run the application upgrade from the VM console. For a physical appliance, you can run the application upgrade from the KVM, VGA, or serial console. (If you are using the serial console, make sure baud rate is configured to 9600. Example: admin# application upgrade Login and Service Contract Required PI-Upgrade-31x_32x_33x_34x_to_3.7.0.0.159.tar.gz defaultRepo (For upgrading from 3.4 to 3.7) This step can take several hours to complete, depending on the size of the application database. |
| Step 12 | When the upgrade is complete: Verify that the application is running by entering the ncs status command in the admin console. Instruct users to clear the browser cache on all client machines that accessed an older version of Prime Infrastructure before they try to connect to the upgraded Prime Infrastructure server. Once Upgrade to 3.7 – Restore the backup of 3.4 – check is the backup restore correctly – any issues while restoring process – need to raise an Cisco TAC issue to restore. Once restored success |
PI 3.7 Take the appliance backup of Fresh Copy.
Upgrading to Latest Prime Infra 3.8/3.9
Due to RH Linux underlay OS changed, we need to install fresh installation of 3.8/3.9 and restore the config from 3.7 backup.
Steps to install 3.8/3.9 from ISO – Install the ISO on the Appliance
To reduce the installation time, choose Admin > Network > Network Settings in the CIMC interface and check the Auto Negotiation check box.
Before You Begin
Download the ISO file PI-APL-3.9.0.0.219-1-K9.iso from cisco.com and verify file integrity using the checksum values listed for it on cisco.com.
You can verify the Cisco Signature for the ISO image with the following steps:
- Download PI-APL-3.9.0.0.219-1-K9.iso, CiscoPI3.9.pem and PI-APL-3.9.0.0.219-1-K9.iso.signature.
- Copy these file to any Linux server and enter the following command.
openssl dgst -sha512 -verifyCiscoPI3.9.pem -signature PI-APL-3.9.0.0.219-1-K9.iso.signature PI-APL-3.9.0.0.219-1-K9.isoThe result will be shown as “Verified”.
| When you connect Gen 2 and Gen 3 appliances through serial console connection after reboot, there are chances that you might encounter garbled screen display. To overcome this issue, you can connect through CIMC or VGA console. |
Procedure
| Step 1 | Connect to the console using one of the options mentioned in Connect to the Console. |
| Step 2 | Mount ISO using any one of the mounting options. |
| Step 3 | Reboot the appliance by pressing the power switch or select Power > Reset System(Warm Boot) if you are using vKVM to restart. |
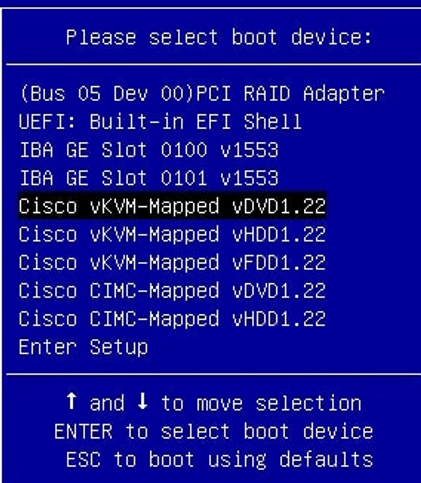
| Step 4 | After the appliance reboots, press F6 to enter the boot option. |
| Step 5 | Select one of the DVD mount option with the Cisco Prime Infrastructure 3.9 software image. |
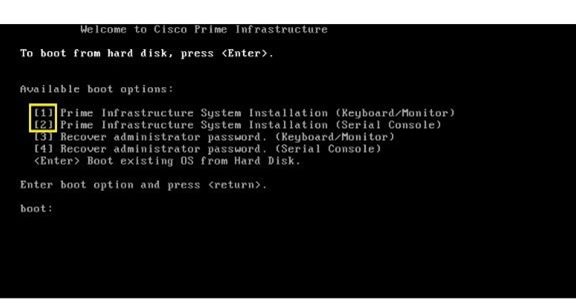
| Step 6 | From the available boot options, enter 1 or 2 carefully, as all future management messages will be displayed in the selected display. 1—Prime Infrastructure System Installation (Keyboard/Monitor) if you are connected through the VGA port/vKVM (KVM Console). All console data /information will appear on the VGA port /vKVM (KVM console). 2—Prime Infrastructure System Installation (Serial Console) if you are connected through the serial port or Serial Over Lan. All console data/information will appear on the serial port or Serial Over Lan. |
The time taken to deploy the image will depend on the network speed.
| Step 7 | Enter setup at the login prompt when prompted to initiate the installation. |
| Cisco Prime Infrastructure is installed only using the 1 Gbps ports. Login to CIMC Console. Navigate to Compute > BIOS > Configure BIOS > Advanced > LOM and PCle Slots Configuration. Choose the Disabled option from the PCIeSlot:MLOM OptionROM and PCIeSlot:MLOM LinkSpeed drop-down lists. Click the Save button. Navigate to Host Power, Power Cycle the machine and then Power ON. |
Once PI 3.9 installed successfully, restore the data from 3.7 backup
Check the backup restored as expected and do additional steps as mention in the document
Procedure
| Step 1 | Configure the new Prime Infrastructure host to use the same remote backup repository as the old host. |
| Step 2 | Restore the application backup on the remote repository to the new host. |
| Step 3 | When the process is complete: Instruct users to clear the browser cache on all client machines that accessed an older version of Prime Infrastructure before they try to connect to the upgraded/restored Prime Infrastructure server. If you are using Prime Infrastructure to manage Cisco Wireless LAN Controllers. |
| Step 4 | After the new Prime Infrastructure 3.9 server is operational. |
Resync with WLC config.
Follow the same process Seconday (there is no restoration required – the upgrade up to 3.9 and Join the Secondary to Primary to synch configuration.
Happpy Labbbbingggggggg!