84 Days to CCIE SEC v6.1 Lab
Cisco TrustSec: The Software-Defined Perimeter
In traditional networking, security is tied to IP addresses. If a user moves or a server changes its subnet, your firewall rules and Access Control Lists (ACLs) break.
Cisco TrustSec solves this by decoupling security from topology. It uses Scalable Group Tags (SGTs)—metadata assigned to traffic at the point of entry—to enforce policy based on identity rather than IP.
What is TrustSec?
TrustSec is a Next-Generation access control mechanism that simplifies the provisioning and management of network security. It operates on three pillars:
- Classification: When a user authenticates (via 802.1X or MAB), they are assigned a decimal value called an SGT (e.g., Finance = 4, HR = 5).
- Propagation: The SGT is inserted into the Layer 2 Ethernet frame (using the Cisco Meta Data/CMD field) and carried across the network.
- Enforcement: The egress device (usually a firewall or another switch) looks at the destination and source SGT and decides whether to permit or deny the traffic using an SGACL (Scalable Group ACL).
Use Case: The “Lateral Movement” Problem
In a standard flat network, if a guest’s laptop is compromised, they can scan and attack a printer or a server in the same VLAN.
- With TrustSec: You create a policy: SGT_Guest cannot talk to SGT_Compliance_Server. Even if they are on the same subnet, the switch will drop the traffic at the hardware level because the tags don’t match the allowed policy.
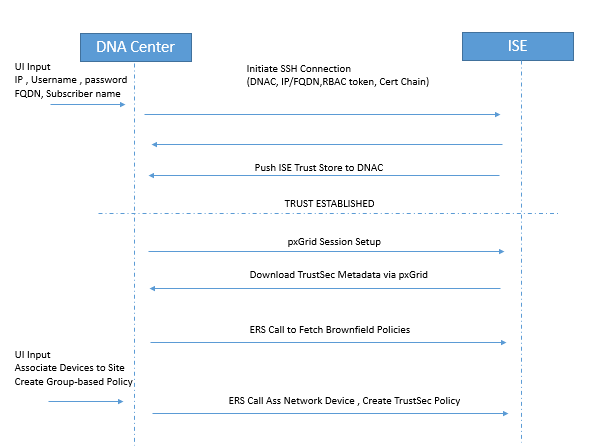
The Power Couple: DNAC and ISE Integration
Cisco DNA Center (DNAC) acts as the orchestrator (the “brain”), while Identity Services Engine (ISE) acts as the policy engine and RADIUS server.
The Integration Workflow
To make TrustSec work at scale, DNAC and ISE must be synchronized via pxGrid and REST APIs.
- Identity Propagation: ISE is the “Source of Truth” for SGTs. When you create a Scalable Group in ISE, it is pushed to DNAC.
- Fabric Provisioning: DNAC configures the underlying hardware (Catalyst switches/Wireless controllers) to support TrustSec (CTS) commands.
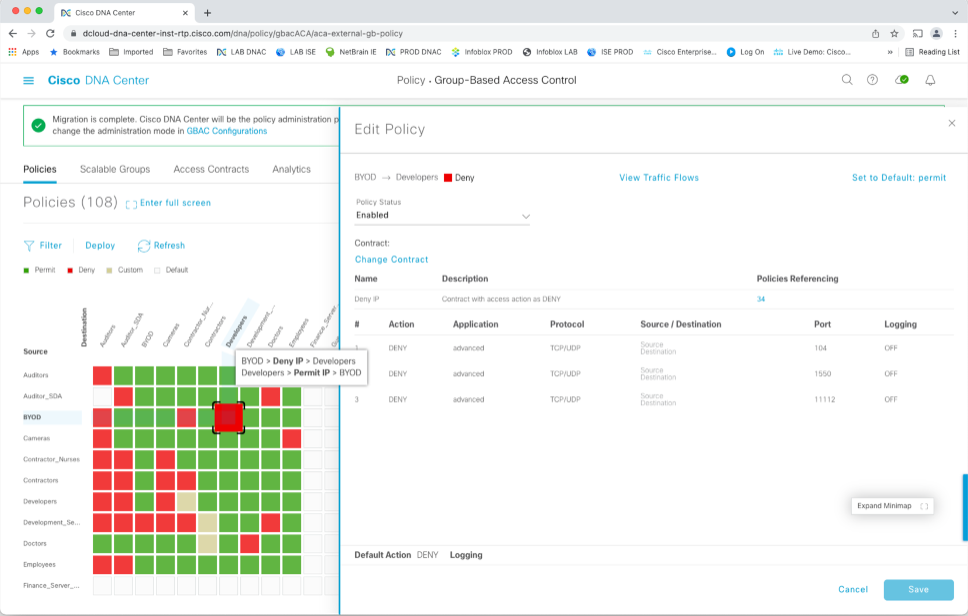
- Policy Matrix: Instead of writing thousands of lines of ACLs, you use a Grid Matrix in either DNAC or ISE. You simply find the intersection of Source SGT and Destination SGT and select “Deny” or “Permit.”
Step-by-Step Concepts: How it works in the Fabric
Step 1: Authentication & Classification
A user connects. ISE validates their credentials. ISE sends an Access-Accept to the switch, which includes the SGT (e.g., SGT 10).
Step 2: Tagging (Inline Tagging)
The switch tags every packet from that user with SGT 10. If the packet moves across the network to another switch, the tag stays inside the Ethernet frame (specifically the 802.1Q header or via VXLAN-GPO in a fabric).
Step 3: Policy Download
The egress switch (where the destination server lives) connects to ISE and downloads the SGT Policy Matrix. It doesn’t need to know the user’s IP; it only needs to know that “SGT 10” is trying to reach “SGT 20” (the Server).
Step 4: Hardware Enforcement
The switch checks its ASIC (TCAM). If the matrix says SGT 10
SGT 20 = Deny, the packet is dropped immediately.
Why use DNAC?
While you can run TrustSec without DNAC (using just ISE and switches), DNAC simplifies the “Propagation” phase. In a non-fabric network, every “hop” must support inline tagging. DNAC automates the deployment of SXP (SGT Exchange Protocol)—a protocol that “tunnels” tags over network segments that don’t support TrustSec—ensuring your security policy remains unbroken from end-to-end.
Pro-Tip: Remember that SGTs are 16-bit values. Always verify your SGT propagation using the command show cts role-based sgt-map all on your edge switches.
Integrating Cisco TrustSec within a DNA Center (DNAC) and Identity Services Engine (ISE) environment requires specific hardware, software, and synchronization steps to function correctly.
1. Key Requirements
Before starting the configuration, ensure these prerequisites are met:
- Hardware Compatibility: All network devices (switches, WLCs) must support Inline Tagging (CMD) to carry SGTs in the Ethernet frame. Catalyst 9000 series switches are the standard for full TrustSec support.
- ISE Services: On the ISE node, you must enable pxGrid (for context sharing) and ERS (External RESTful Services) with Read/Write access.
- Network Reachability & Ports: DNAC and ISE must communicate over ports 443 (HTTPS/ERS), 5222 (pxGrid), 8910, and 9060.
- Certificates: Both systems must trust each other’s certificates. It is recommended that the ISE internal CA sign the pxGrid certificates.
- MTU Adjustments: TrustSec adds an 8-byte overhead to Ethernet frames; ensure your MTU is at least 1508 bytes on all transit links to avoid fragmentation or drops.
2. Configuration Steps (Integration & Policy)
Step 1: Prepare ISE
- Enable TrustSec Role: Go to Administration > System > Deployment, edit your node, and check Enable TrustSec and Enable SXP Service.
- Enable APIs: Navigate to Administration > System > Settings > ERS Settings and select Enable ERS for Read/Write.
- pxGrid Settings: Ensure pxGrid is enabled and set to Automatically approve new certificate-based accounts to allow DNAC to subscribe seamlessly.
Step 2: Integrate DNAC with ISE
- In DNAC, navigate to System > Settings > Authentication and Policy Servers.
- Add the ISE server using its FQDN (IP-only is often unsupported for certificate reasons), admin credentials, and a Shared Secret for RADIUS.
- Verify the status shows as Active or Connected.
Step 3: Define Scalable Groups (SGTs)
- In an SD-Access/DNAC environment, always create SGTs in DNAC first (Policy > Group-Based Access Control > Scalable Groups).
- DNAC will automatically push these groups to ISE via the API.
Step 4: Create Policies (Contracts & Matrix)
- Create a Contract: In DNAC (Policy > Contracts), define what traffic is allowed (e.g., Permit IP, Deny SSH).
- Assign Policy: Go to Policy > Group-Based Access Control Policies, select a Source SGT and Destination SGT, and assign the contract.
- Deploy: Click Deploy. This pushes the SGACL (Scalable Group ACL) to ISE and notifies the network devices to download the new policy matrix.
Step 5: Provision Fabric Devices
- Use DNAC to provision your switches. DNAC will configure the necessary
ctscommands on the switch CLI automatically. - Verification: On a switch, use
show cts environment-datato confirm SGTs are downloaded andshow cts role-based permissionsto see the active policy matrix.
Use Case Summary
The primary use case is Micro-segmentation. For example, if you have two groups (e.g., “Contractors” and “Internal_Devs”) on the same VLAN, you can use a DNAC policy to block Contractors from accessing the Devs’ servers without ever touching a traditional IP-based firewall rule.
Happy Labingggggggggggggg !