WLC HA (Primary Fails – RMA replacement)
I have done this in the past, but due to some reason not able to get my documents and steps, now i done some replacement recently – so this document covers.
Requirement PC with Console Cable
DP9 connector to connect to WLC.
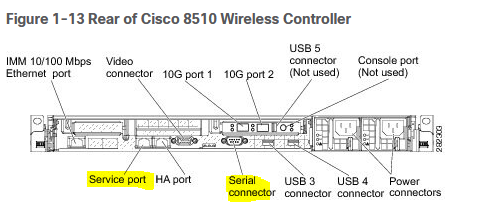
WLC Ports information :
I know the WLC AirOS going to end of soon, i have new blog coming soon with WLC Cat 9800 HA setup and steps.
Background –
Cisco 8K WLC running in HA/SSO Mode.
Due to some hardware failure the Primary WLC failed and TAC sent replacement.
First step : ( dont completly rely on Cisco TAC – they sent a good hardware you can straight away replace and put them live)
- Power on WLC – make sure it boot as expected and leave burning test for atlease 5 hours before you think of replacing – (i have some use case box failed after 2 hours or so )
- Once the WLC seems to be stable and you satisfied.
- check is this box already configured – if so reset to factory.
When you see below message :
(Cisco Controller)
Enter User Name (or ‘Recover-Config‘ this one-time only to reset configuration to factory defaults)
User: Recover-Config – this will reset the config and default
Once Conntroller boot (takes 2-5min to boot this process)
below basic setup required :
(Cisco Controller)
Welcome to the Cisco Wizard Configuration Tool
Use the ‘-‘ character to backup
Would you like to terminate autoinstall? [yes]: yes
System Name [Cisco_xx:xx:xx] (31 characters max):
AUTO-INSTALL: process terminated — no configuration loaded
BBLAB
Enter Administrative User Name (24 characters max): admin
Enter Administrative Password (3 to 24 characters):
Re-enter Administrative Password :
Service Interface IP Address Configuration [static][DHCP]: static
Service Interface IP Address: 192.168.1.10
Service Interface Netmask: 255.255.255.0
Enable Link Aggregation (LAG) [yes][NO]: NO
Management Interface IP Address: 192.168.x.x (this is very important config – make sure you use the free IP address in line with HA mgmt IP)
Management Interface Netmask: 255.255.255.0
Management Interface Default Router: 192.168.x.1
Management Interface VLAN Identifier (0 = untagged): 1
Management Interface Port Num [1 to 2]: 1
Management Interface DHCP Server IP Address: 192.168.1.1
Enable HA [yes][NO]: NO
Virtual Gateway IP Address: y.y.y.y (this can be anything)
Multicast IP Address: 239.255.1.X
Mobility/RF Group Name: admin
Network Name (SSID): admin
Enter Country Code list (enter ‘help’ for a list of countries) [US]: GB
Enable 802.11b Network [YES][no]:
Enable 802.11a Network [YES][no]:
Enable 802.11g Network [YES][no]:
Enable Auto-RF [YES][no]:
Enter the NTP server’s IP address: 10.10.10.1
Enter a polling interval between 3600 and 604800 secs: 3600
Would you like to configure IPv6 parameters[YES][no]: NO
Configuration correct? If yes, system will save it and reset. [yes][NO]: yes
Cleaning up DHCP Server
Updating HBL license statistics file
Done.
Configuration saved!
Resetting system with new configuration…
Updating license storage … Done.
The WLC will reboot.
Connecting PC to WLC on SP to configure using GUI
PC should be having IP address of same subnet as 192.168.1.X (my case 192.168.1.100)
Once WLC booted login using admin and password (used while setup time)
check make sure port is up as below :
(Cisco Controller) >show port summary
STP Admin Physical Physical Link LinkPr Type Stat Mode Mode Status Status Trap POE
1 Normal Disa Enable Auto Auto Down Enable N/A
2 Normal Disa Enable Auto Auto Down Enable N/A
RP Normal Disa Enable Auto Auto Down Enable N/A
SP Normal Forw Enable Auto Auto Up Enable N/A
ping from PC 192.168.1.10 (if that works)
Use IE browser https://192.168.1.10
Download the same Firware are ACTIVE Now ( that is standby) and upgrade the firmware and reload the device.
Once booted successfully.
WLC Command level just config as below for redundancy config :
(Cisco Controller>config interface address redundancy-management LOCALIP peer-redundancy-management REMOTEIP
save the config
Move to kit to Production location, (remove old failed WLC) – make sure you note the connection before you remove the cables – take picture to save time.
Rack new RMA Unit to same location :
Power on new WLC
Once it booted completly
Connect redundancy ports together on primary/secondary. Connect the other network ports.
on RMA unit Console
>config redundancy mode sso
The WLC will reboot to enable sso and pull the config from the current active (secondary in this case) unit xml on boot.
While booting time you see below messages :
passed!
XML config selected
iptables: Chain already exists.
ip6tables: Chain already exists.
Validating XML configuration
octeon_device_init: found 1 DPs
Cisco is a trademark of Cisco Systems, Inc.
Software Copyright Cisco Systems, Inc. All rights reserved.
……
Starting Fastpath Hardware Acceleration: ok
Starting Fastpath DP Heartbeat : ok
….
HBL initialization is successful
Starting Licensing Services: ok
Starting Redundancy: Starting Peer Search Timer of 120 seconds
Initiate Role Negotiation Message to peer
Found the Peer. Starting Role Determination…ok
Start rmgrPingTask: ok
….
Starting CPU ACL Logging services: ok
(WLC-Standby)
User :
This means HA is ok, and take sometime to sync.
On the Current Active you can issue command for bulk sync check :
(WLC-01) >show redundancy summary
Redundancy Mode = SSO ENABLED
Local State = ACTIVE
Peer State = STANDBY HOT
Unit = Secondary (Inherited AP License Count = 6000)
Unit ID = xxxxxxxxxxxxxxxx
Redundancy State = SSO
Mobility MAC = xxxxxxxxxxxxxx
Redundancy Port = UP
BulkSync Status = In-Progress (this should be Compeleted) – until that time suggest to not make any major changes
Average Redundancy Peer Reachability Latency = 69 Micro Seconds
Average Management Gateway Reachability Latency = 567 Micro Seconds
Once config is bulk-synced the primary unit is now in HOT STANDBY
Redundancy force-switchover – if you like to fail over to recently replaced WLC
Other Notes for License and Mobility :
Make sure to check your mobility group as the new pair will use the MAC address from the replacement primary and not the active secondary.
You can either use config redundancy mac on the replacement primary to use the custom MAC you have already configured on your mobility groups.
If you do not do this it cannot be changed after pairing. Then you will have to update the mobility groups themselves with the new mobility MAC from the HA pair.
Hope this help …………Be patient – do not make any changes – this have other side effect failing between WLC cause AP reboot and Client disconnect.
Happy Labbinggggggggggggggggggg!!!!!!