Disable Windows 10 Firewall using Power shell
How to disable the Windows Firewall(FW) with PowerShell in Windows 10 or Windows Server – Some time as network engineer you need to test some of the network testing and applicaiton testing, make sure it wokring (not FW issue) you need to disable FW – Once testing done I Suggest back Windows Firewall with PowerShell.
I have used below steps – how to disable Windows Firewall with PowerShell.
Disable Windows Firewall with PowerShell
How to disable the Windows Firewall with PowerShell in Windows Server 2012/2016/2019? I don’t recommend turning off the Windows Firewall with PowerShell. But if you have a test lab and want to disable it for testing, go ahead. Don’t forget to enable the Firewall when you finish testing. In this article, you will learn how to disable Windows Firewall with PowerShell.
Windows Firewall profiles information
Windows Firewall offers three firewall profiles:
- Domain profile: applies to networks where the host system can authenticate to a domain controller.
- Private profile: a user-assigned profile and is used to designate private or home networks.
- Public profile: this is the default profile. It is used to designate public networks such as Wi-Fi hotspots at coffee shops, airports, and other locations.
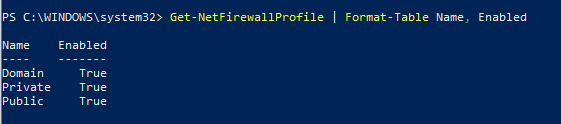
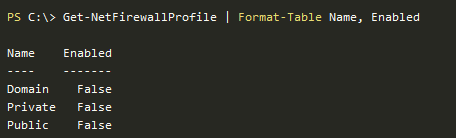
Get status of the Windows Firewall with PowerShell
>Get-NetFirewallProfile | Format-Table Name, Enabled
Disable Windows Firewall
> Set-NetFirewallProfile -Profile Domain, Public, Private -Enabled False
After testing – you want to enable back use below command :
> Set-NetFirewallProfile -Profile Domain, Public, Private -Enabled True
Happy LabbbbinnnnnnnnnnnnnnnnnnG