85 Days to CCIE SEC v6.1 Lab
NGIPS and FMC
Cisco Secure Firewall (formerly Firepower) requires a deep understanding of how the Management Center (FMC) orchestrates the “brains” of the operation: Snort.
Core Concepts & Terminology
You must separate the management interface from the detection engine.
Key Components
- FMC (Management Center): The centralized “Manager.” It handles policy configuration, threat intelligence updates (Talos), and event aggregation.
- FTD (Firepower Threat Defense): The “Sensor.” This is the unified image combining ASA (L3/L4) and Firepower (L7) capabilities.
- Snort: The Open Source engine inside FTD that performs the actual Deep Packet Inspection (DPI).
Terminology
- DAQ (Data Acquisition Layer): The library that acts as an intermediary between the FTD hardware interfaces and the Snort engine.
- Prefilter Policy: A “fast-path” mechanism used to bypass Snort for trusted traffic (like backups or encrypted tunnels) to save CPU.
- Security Intelligence (SI): IP/URL/DNS reputation feeds from Cisco Talos that block known bad actors before the IPS engine even looks at the packet.
- Variable Sets: Defines your environment (e.g.,
$HOME_NETvs$EXTERNAL_NET) so Snort knows which direction to apply specific rules.
What is SNORT?
Snort is the industry-standard IPS engine. In FTD, it operates using Signatures (Rules).
- Snort 2: Legacy, single-threaded (processes one packet at a time per instance).
- Snort 3: Modern, multi-threaded. It offers better performance, simplified rule writing, and improved memory management.
How it protects: It doesn’t just look at headers; it reassembles data streams to find malicious patterns (e.g., a SQL injection hidden inside an HTTP POST request).
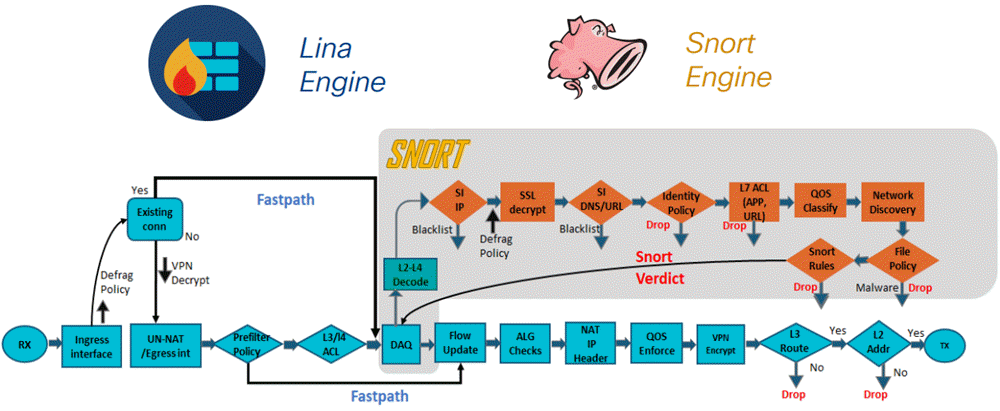
Traffic Flow: In and Out (The Pipeline)
You must understand the Order of Operations inside an FTD. Traffic follows this specific path:
- Ingress Header Processing: The packet enters the interface. LINA (the ASA engine) checks Layer 2-4 (Is it a valid TCP flag? Does it match a NAT rule?).
- Prefilter Policy: The device checks if this traffic is “Fast-Tracked” (bypassing Snort) or “Sent to Snort.”
- Security Intelligence: If the IP is on a “Global Block List,” the packet is dropped immediately.
- Access Control Policy (ACP):
- L3/L4 Rules: Matches based on IP/Port.
- L7 Rules: Traffic is handed to Snort via the DAQ.
- Snort Inspection (The Deep Dive):
- App-ID: Identifies the application (e.g., “Skype”).
- URL Filtering: Checks the category (e.g., “Gambling”).
- IPS Policy: Matches against Snort rules.
- File/Malware Policy: Calculates file hashes for AMP.
- Verdict: Snort tells LINA “Drop” or “Allow.”
- Egress: If allowed, the packet is rewritten (NAT) and sent out the egress interface.
Use Case: Step-by-Step Protection
Scenario: Protect an internal Web Server from a “Remote Code Execution” (RCE) vulnerability.
- Step 1: Network Discovery. Enable a Network Discovery policy on FMC. This allows the sensor to “see” that your server is running Apache on Linux.
- Step 2: Create Intrusion Policy. In Policies > Intrusion, create a new policy using the “Balanced Security and Connectivity” base.
- Step 3: Firepower Recommendations. Click “Generate Recommendations.” FMC will automatically enable only the rules that apply to Apache and Linux, disabling irrelevant rules (like Windows/IIS) to optimize performance.
- Step 4: Layer 7 Rule. Create an Access Control Rule:
Source: Any->Destination: Web_Server_IP->Application: HTTP.- Under the Inspection tab, attach your Intrusion Policy.
- Step 5: Logging. Enable “Log at End of Connection” to see the event in the FMC Dashboard.
- Step 6: Deploy. Push the config to the FTD.
Best Practices
| Strategy | Why it Matters |
|---|---|
| Trust Fast-Path | Use Prefilter policies for high-bandwidth, low-risk traffic (e.g., Inter-VLAN SQL traffic) to reduce Snort CPU load. |
| Inline Sets | Always use “Inline” (not Passive) if you want the NGIPS to actually block threats rather than just alert. |
| SSL Inspection | Crucial: Over 90% of web traffic is encrypted. If you don’t configure an SSL Decryption policy, Snort is “blind” to the payload. |
| Variable Sets | Ensure $HOME_NET is defined as your internal RFC1918 space. If left as any, Snort rules may trigger incorrectly, causing false positives. |
File & Malware Policy
While the IPS Policy looks for exploit “commands,” the File Policy looks at the “payload” (the .exe, .pdf, or .zip file). In the FMC, this is handled by Cisco Secure Endpoint (formerly AMP).
Key Terminology
- SHA-256 Hash: A unique digital fingerprint of a file. FMC sends only this hash to the cloud, not the whole file (unless configured otherwise).
- Disposition: The status of a file: Clean, Malicious, or Unknown.
- Malware Cloud Lookup: The real-time query sent from the FTD to the Cisco Talos cloud.
- Spero Engine: A machine-learning engine that examines the structure of a file to predict if it is malicious even without a signature.
- Dynamic Analysis (Sandboxing): Sending an “Unknown” file to Cisco Threat Grid to be executed in a safe virtual environment to observe its behavior.
Use Case: Blocking Ransomware via HTTP/FTP
Scenario: A user attempts to download a “Software Update” that is actually a disguised ransomware executable.
Step-by-Step Configuration in FMC:
- Create File Policy:
- Navigate to Policies > Malware & File.
- Add a rule for “Office Documents” and “Executables.”
- Action: Select Block Malware. This enables the Cisco Malware Cloud Lookup.
- Enable Analysis:
- Check Spero Analysis for executables.
- (Optional) Check Dynamic Analysis to send unknown files to the Sandbox.
- Integrate into ACP:
- Edit your Access Control Policy.
- On the rule allowing Web Traffic, go to the File Policy tab and select the policy you just created.
- Deployment:
- Deploy to the FTD. Snort will now extract files from the TCP stream and calculate their hashes in real-time.
The Security Flow
One of the most powerful features in the CCIE curriculum is the Retrospective Event.
- Inbound: A user downloads
file.exe. The FMC checks the hash; the Cloud says “Unknown.” The file is allowed. - The Shift: One hour later, Talos identifies that file as a new strain of malware.
- The Alert: The Cisco FMC receives a Retroactive Disposition update.
- Response: The FMC marks the event in red. You can now see exactly which host has the file and initiate a quarantine via Cisco ISE using Rapid Threat Containment (RTC).
The Integrated Best Practice Flow
When building your CCIE lab, always follow this order of operations for a “Gold Standard” policy:
| Step | Component | Action |
|---|---|---|
| 1 | SSL Decryption | Resign traffic so Snort can see the files. |
| 2 | Prefilter | Fast-path trusted video/voice traffic to save CPU. |
| 3 | Security Intel | Block known bad IPs/URLs globally at the start. |
| 4 | IPS Policy | Use Recommendations to auto-tune Snort rules. |
| 5 | File Policy | Enable Block Malware for all common file types. |
Verify Snort Engine Health
The Snort engine must be active and correctly versioned to perform NGIPS functions.
- Check Active Version: Run
show snort3 status.- If “Currently running Snort 3” appears, the modern multithreaded engine is active.
- If no output or “Currently running Snort 2” appears, you are on the legacy engine.
- Instance Distribution: Use
show snort instancesto see how many Snort processes are running and how traffic is distributed across CPU cores. - Performance Counters: Use
show snort statisticsto view real-time data on packets inspected, dropped, or “judged” by the engine.
Troubleshooting the Data Path (LINA vs. Snort)
When traffic is dropped, you must determine if it was a Layer 3/4 ACL drop (LINA) or an L7 Security drop (Snort).
- ASP Drop Reasons: Run
show asp drop. Look for specific Snort-related counters:snort-block: Traffic was intentionally blocked by an IPS or File policy.snort-busy: The engine is overwhelmed and dropping traffic it cannot process.
- Packet Capture with Trace: Run
capture ASP_DROPS type asp-drop allto capture the actual packets being discarded and see the exact drop reason in the trace. - Packet Tracer: Use the FMC Advanced Troubleshooting Menu (under System > Health > Monitor) to run a “Packet Tracer”. This simulates a packet through the pipeline to see which rule—Prefilter, SI, or ACP—is affecting it.
File & Malware Verification
- File Inspection Stats: While many detailed stats are GUI-based, you can verify the status of the “sftunnel” (the connection used to send file hashes to the FMC/Cloud) with
sftunnel-status-brief. - Advanced Logs: Enter the Expert Mode by typing
expert, thensudo suto access the Linux shell for deep log analysis. (Note: Use caution here as this is outside standard CLI support).
Management Connectivity
If the FMC isn’t receiving events, verify the control plane:
- Management Tunnel: Ensure port 8305 is open and established using
netstat -an | grep 8305.
Happy Labingggggggggggggggg !