87 Days to CCIE SEC v6.1 Lab
ISE – SGT, and SXP
In the world of modern networking, the old-school method of relying solely on IP addresses and VLANs for security is becoming obsolete. As users move between offices, use multiple devices, and access cloud resources, managing thousands of Access Control Lists (ACLs) becomes a nightmare.
This is where Cisco TrustSec steps in, transforming how we enforce policy through Scalable Group Tags (SGTs) and the SGT Exchange Protocol (SXP).
The Core Concepts
To understand the solution, we need to break down the three pillars:
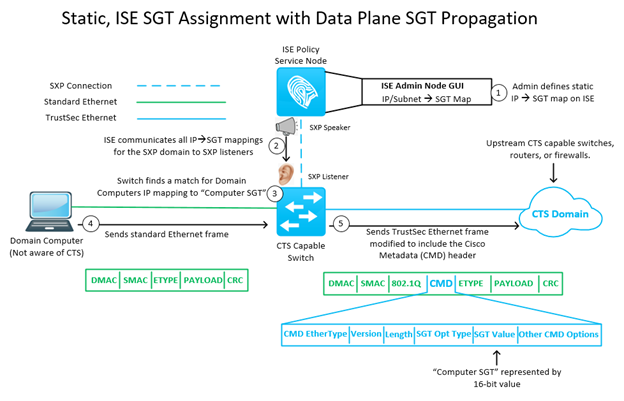
- ISE (Identity Services Engine): The “Brain” of the operation. It authenticates users and devices, assigning them a specific role based on context (Who, What, Where, and How).
- SGT (Scalable Group Tag): A 16-bit value inserted into the Ethernet frame. Instead of saying “IP 10.1.1.5 is blocked,” we say “The SGT: Finance is blocked from accessing SGT: HR.” Security is now based on Identity, not location.
- SXP (SGT Exchange Protocol): Not all hardware can read SGT tags in the hardware (ASIC) level. SXP is a control-plane protocol that “speaks” for these older or incompatible devices, carrying the IP-to-SGT mappings across the network so policy can still be enforced.
How They Work Together
- Authentication: A user logs into the network via a switch or WLC.
- Classification: ISE authenticates the user and pushes an SGT (e.g., Tag 10) to the NAD (Network Access Device).
- Propagation: The switch tags the traffic. If the path to the destination involves “non-TrustSec” devices, SXP creates a TCP tunnel to share the IP-to-SGT binding with the next “TrustSec-aware” hop.
- Enforcement: At the egress point (closest to the resource), the device checks the Security Group ACL (SGACL) and decides whether to permit or deny the traffic based on the source and destination tags.
Use Case: The “Guest vs. Employee” Conflict
Imagine a hospital environment. Doctors need access to Patient Records, while Guests only need Internet access. Both are connected to the same physical switch.
- Without SGTs: You would need complex VRFs or hundreds of lines of ACLs updated every time a subnet changes.
- With SGTs: ISE identifies the Doctor and assigns SGT 5. It identifies the Guest and assigns SGT 15. A single policy is written:
Source SGT 15 to Destination SGT 5 = DENY. It doesn’t matter which floor they are on or what their IP address is; the policy follows the identity.
Advantages of Using SXP and SGT
| Feature | Benefit |
|---|---|
| Topology Independence | Policies are decoupled from IP subnets and VLANs. |
| Reduced Complexity | Replaces thousands of lines of traditional ACLs with a simple matrix. |
| Scalability | Adding a new branch doesn’t require updating ACLs at the Data Centre. |
| Legacy Support | SXP allows you to implement modern security even on older hardware that doesn’t support inline tagging. |
Sample Configuration (CLI)
Below is a simplified look at how you enable SXP and define a local SGT mapping on a Cisco IOS-XE switch.
1. Enable SXP and define a Peering (e.g., with ISE):
# Enable SXP globally
cts sxp enable

# Configure the connection to ISE (the SXP Speaker)
cts sxp default source-ip 192.168.10.1
cts sxp connection peer 192.168.10.100 password default mode local speaker
2. Manual IP-to-SGT Mapping (for static resources like Servers):
# Assign SGT 10 to a specific server IP
cts role-based identity-map static sgt 10 address 10.1.1.50
3. Applying an SGACL (Enforcement):
# Traffic from SGT 15 (Guest) to SGT 10 (Server)
ip access-list role-based BLOCK_GUEST
 deny ip

# Apply the policy
cts role-based permissions from 15 to 10 ipv4 BLOCK_GUEST
Summary
The combination of ISE, SGT, and SXP moves security from a “network-centric” model to an “identity-centric” model. It simplifies administration, reduces the risk of human error in ACL management, and ensures that security policies remain consistent regardless of how the network grows.
Happy Labingggggggggggggggggggggggg!